I wanted to make a super simple, cliff-notes-style introduction to inner joins and left joins, two of the most common joins you’ll encounter in MySQL-type relational databases. I always forget what they mean, so this is for me too. This is basically a condensed version of this wikipedia article.
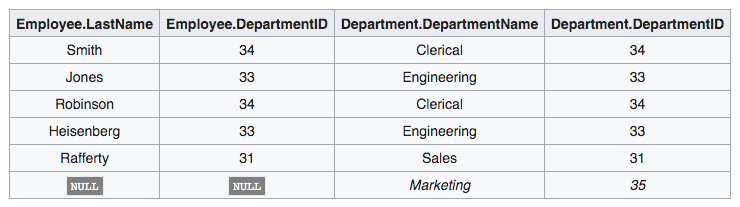
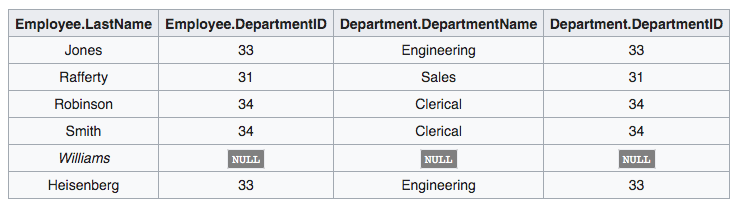
All code in this post will use this sample database:

Employees can be assigned to departments. A department can have more than one employee, but an employee can only be in one department, or unassigned. Notice that one department, Marketing, has no employees assigned, and one employee, Williams, is not assigned to any department (signified by NULL in his DepartmentID column).
Joins compare all the rows in one table (the “left” table) against all the rows in another table (the “right” table), and let you ask meaningful questions that span multiple tables. An ON condition is used to specify what constitutes a “match” between any two rows picked from either table. In this post, the employee table will be the left table, and the department table willbe the right table, and all of our joins will use the ON condition where the DepartmentID matches between the two tables.
The output can then modified by the SELECT clause of the query, as usual, but all of the examples will use SELECT * for simplicity.
Left Join – “What department, if any, are my employees assigned to?”
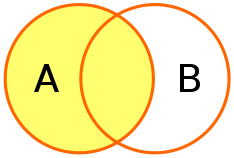
In a left join, there will be a row in the output for each row in the left table, the table before the JOIN statement. The engine compares each row in the left table against each row in the right table and fills in the values based on the results of the ON condition.
SELECT *
FROM employee
LEFT JOIN department
ON employee.DepartmentID = department.DepartmentID;
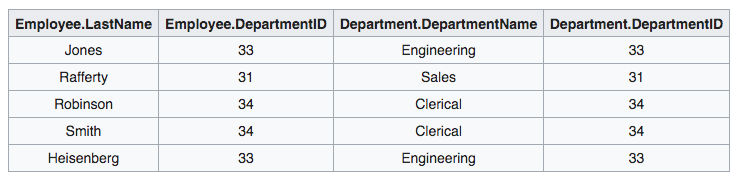
The above query produces the following output:
Notice there is a row in the output for every employee, including the unassigned one, Williams, since employee is the left table in the join (appears before the JOIN keyword). For each employee, the engine finds the corresponding row in the department table, where the ON condition is met, where they have the same DepartmentID. For assigned employees, the output will contain all values from both rows.
However, for Williams’ row, the ON condition is not met. His DepartmentID is NULL, so there is no corresponding row in the department table to use in the output. Since this is a LEFT JOIN, the engine fills in the output values with NULL.
Notice also that the department with no employees, Marketing, does not show up in the output. This is because department is the right table in the join, and not every row in the right table is guaranteed to show up in the output in a LEFT JOIN. There was no employee row pointing to it, so it gets left out of the output.
This query answers the question “What department, if any, are my employees assigned to?” with NULL values signifying “none”.
Inner Join – “What department are my employees assigned to, excluding unassigned employees and empty departments?”
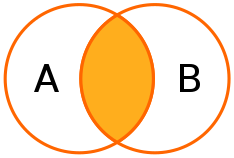
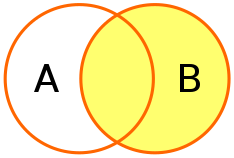
In an inner join, there will only be a row in the output if the ON condition is satisfied for both the left and the right tables.
SELECT *
FROM employee
INNER JOIN department
ON employee.DepartmentID = department.DepartmentID;
The above query produces the following output:
Notice this time there is no row in the output for the unassigned employee Williams OR the empty department Marketing. When the engine compares Williams’ row to the department table, it again finds no corresponding row where both DepartmentIDs satisfy the ON condition, where they are equal. Rather than fill in the missing values with NULL, it drops the row from the output completely. When the engine finishes comparing each employee row against the department table, again, Marketing was not used, and so it does not appear in the output either.
This query answers the question “Show me details of all employees that are assigned to a department, and details of said department”. It also answers the question, “Show me details of all departments with assigned employees, and details of said employees”.
Right Join – “What employees, if any, do my departments contain?”
I’m not going to go into it in-depth, as I haven’t seen it much in production, there is a corresponding right join to match the left join, where each row in the right table produces a row in the output, and the rest of the values are filled in from the corresponding rows in the left table, or NULL if no rows in the left table can be found that match the ON condition.
Query and output:
SELECT *
FROM employee
RIGHT JOIN department ON employee.DepartmentID = department.DepartmentID;