Monthly Archives: April 2015

Self-hosted adhoc IPA delivery of iOS apps

Although this may be old hat for many, I recently learned this from an iOS project I’ve been working on.

With the acquisition of Testflight by Apple, you can now do iOS beta-testing directly through iTunes Connect, and you don’t need device UDIDs to get your adhoc IPAs on your testers’ devices. But what if, like this recent project, you have to target iOS 7 (Testflight beta testing from Apple only works on iOS 8 and up)? And what if you don’t want to wait for Apple’s beta review process before a beta app goes out?

In that case, you can host your adhoc IPAs for download on your own server. First you have to do the old process of getting device UDIDs from your testers, entering them into iTunes connect, and creating a distribution provisioning profile with those devices enabled.

Once you’ve done all that, and you’ve created your adhoc IPA, you can go ahead and upload that file to your server. Remember where you put it, because you’ll need the full URL to your ipa in the next steps.

Create a .plist file on your server with the following data in it. You’ll need to enter the full URL to your IPA, the bundle ID of your app, its current version, and its name. Make sure to remove the brackets from the code below when entering your values.

Sample .plist file:

<?xml version="1.0" encoding="UTF-8"?>
<!DOCTYPE plist PUBLIC "-//Apple//DTD PLIST 1.0//EN" "http://www.apple.com/DTDs/PropertyList-1.0.dtd">
<plist version="1.0">
<dict>
	<key>items</key>
	<array>
		<dict>
			<key>assets</key>
			<array>
				<dict>
					<key>kind</key>
					<string>software-package</string>
					<key>url</key>
					<string>[http://yourserver.com/path/to/ipa]</string>
				</dict>
			</array>
			<key>metadata</key>
			<dict>
				<key>bundle-identifier</key>
				<string>[com.yourcompany.yourgame]</string>
				<key>bundle-version</key>
				<string>c[urrent version of your app]</string>
				<key>kind</key>
				<string>software</string>
				<key>title</key>
				<string>[name of your app]</string>
			</dict>
		</dict>
	</array>
</dict>
</plist>

Save that as a .plist file, and upload it to your server. Remember the full URL to the .plist file.

Next, create a HTML file on your server with the following code in it, replacing the part with the full URL to your plist:

<a href="itms-services://?action=download-manifest&url=http://yourserver.com/path/to/plist">click here to install<a>

Navigate to that page on your device, click the link, and it should work! (assuming the adhoc provisioning profile you built your app with contains permissions for your device)
ANE for iOS with Custom Framework – Using Custom Fonts

We’re developing a set of games for iOS, some objective-C and some using Adobe AIR, and we’re using an iOS custom framework to hold a bunch of storyboard-based screens that we want to use across all the apps.

On the AIR side, we’ve created an Adobe Native Extension and figured out how to include our framework in it. This may be a subject for another blog post, because it was quite complicated, but this post really helped us figure out how to get all the images, storyboards, and sound files (among other assets) to get included in the ANE, and thus into the final app. We also used it to include our custom font file that the storyboards made heavy use of.

However, this was not enough. Using this post, I was able to troubleshoot all the possible steps that could go wrong. I had to make sure that the .ttf file got included in the final output of the framework, but the real key was Step 4 – adding the font information to your app’s info.plist file. Since an ANE is NOT an app, these keys need to go in the info.plist of the final app the ANE gets included in. But AIR apps use an Application Descriptor File, not an info.plist file. The info.plist file of the completed .IPA is auto-generated when the app is built.

Not to worry, Adobe has provided a place in said app descriptor file where you can specify items to add to the auto-generated info.plist. Appropriately enough, it’s called the InfoAdditions element. The content of this element must be wrapped in CDATA tags, and anything inside it will be added to the info.plist of the final app. So, in an XCode sample app, I followed step 4 above and created the required key/value in XCode’s graphical plist editor, and then opened the generated file in a text editor and copy/pasted those values. Here’s what I got:

<key>UIAppFonts</key>
<array>
	<string>name-of-your-font.ttf</string>
</array>

And here’s what that looks like pasted into an InfoAdditions tag in the app descriptor:

<iPhone>
	<InfoAdditions><!&#91;CDATA&#91;
		<key>UIAppFonts</key>
		<array>
			<string>name-of-your-font.ttf</string>
		</array>
	&#93;&#93;></InfoAdditions>
</iPhone>

I’ve omitted lots of other things that are in my descriptor for brevity – keys specifying minimum iOS version, custom URL schemes, which devices the app targets – but you get the idea.

Once I had this all put together, it worked like a charm! Our storyboards look great as ever with their custom fonts!

Install Android apps from outside the Play Store

The screenshots for this post are from my Samsung Galaxy Tab 2 running Android 4.2 Jelly Bean.

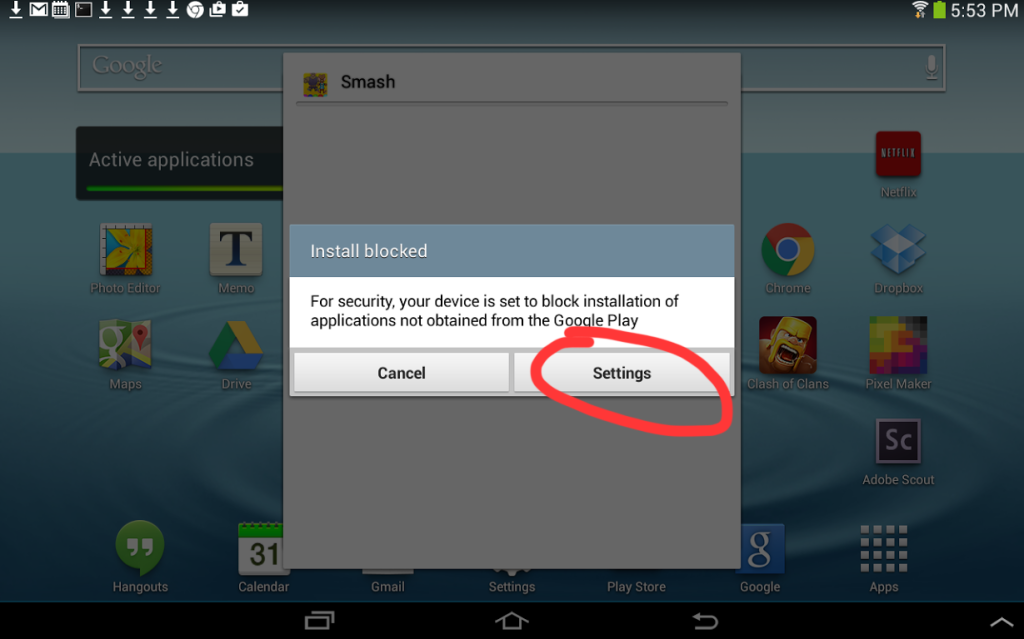
When you click on a downloaded .APK in your downloads app, your device will tell you that the installation is blocked. You’ll want to click the settings button.
androidoutsidestorestep1

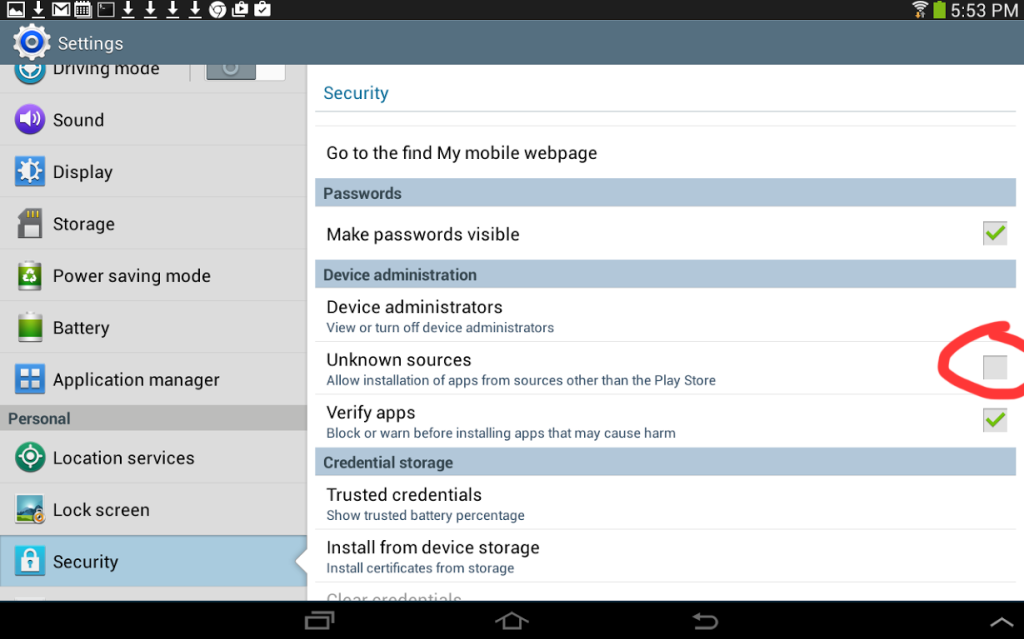
Clicking the settings button in the previous image takes you to the settings app, where you will want click the checkmark next to “Unknown Sources”.
androidoutsidestorestep2

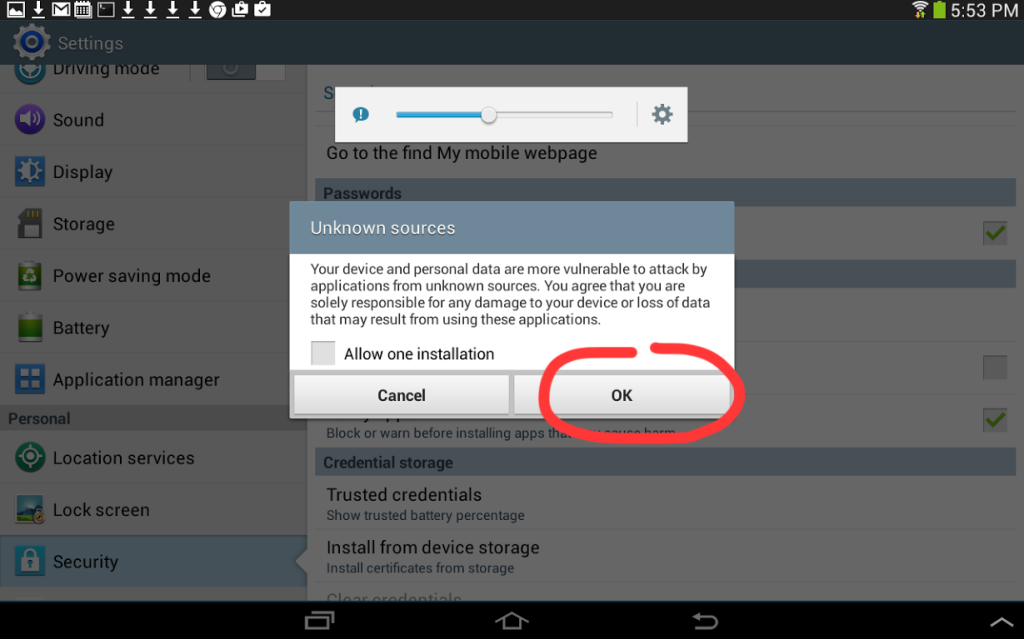
Once you do that, the device warns you that you do this at your own risk, because you could possibly download a malicious app that hurts your tablet. Read the warning carefully, and then click “OK”.
androidoutsidestorestep3

Now you can download apps from outside the Google Play store for testing, etc. Be careful and don’t download apps that aren’t from sources you trust, and consider turning off this capability once you don’t need it anymore.

Flash Builder 4.7 hangs loading workbench OSX

Today Flash Builder randomly started hanging while loading the workbench on startup.

I found a lot of places that said to delete the .snap directory located at [workspacelocation]/.metadata/.plugins/org.eclipse.core.resources but there was never a .snap file or folder.

Eventually I found a trick here that said the following:

remove all the <editor> elements in workspace\.metadata\.plugins\org.eclipse.ui.workbench\workbench.xml

I did that and at least got Flash Builder to start up.

You apparently can also delete all the files in the [workspacelocation]/.metadata/.plugins/org.eclipse.ui.workbench as well (this removes your custom window layouts), but I haven’t tried this method.

As a last-ditch effort, you could do one of the following:

  • delete your .metadata folder in your workspace folder. You will have to reimport ALL your projects after doing this.
  • close Flash Builder, rename your workspace folder (defaults to “Adobe Flash Builder 4.7”), and re-open Flash Builder. It will create a new, empty workspace. Then quit flash builder again, delete the empty workspace, and rename your old workspace to its old name. Hopefully when you start Flash Builder again, things will work better.
  • This post has the following workaround (copied here to protect against link-rot). This is for Flash Builder 4.5 but may work for 4.7.
    This happens because the Eclipse workspace gets corrupted. The easiest way I've found to recover from this is as follows:
     
    1. Use Windows Task Manager (Ctrl+Shift+Esc) to make sure FlashBuilder.exe isn't running as a process. End the process if it is.
    2. Navigate to your workspace folder (the default location is under your users folder in "Adobe Flash Builder 4.5", though you may have placed is elsewhere).
    Mine is c:\Users\grayson\Adobe Flash Builder 4.5
    3. There is a folder named .metadata (on Windows 7 there is an issue where it may appear as a nameless folder because Windows started truncating the "extension")
    move it to another location on your hard drive.
    4. Launch Flash Builder to make sure that this it has solved the issue.
    5. Close Flash Builder (this writes the default workspace settings to the .metadata folder in your workspace location)
    Inside the original copy of the .metadata folder you made, COPY the following folders to the same location in the newly created .metadata folder in your workspace folder, overwriting the files and folders that are there.
    .metadata\.plugins\org.eclipse.core.resources\
    .metadata\.plugins\org.eclipse.core.runtime\
    (as I mentioned before, Windows 7 can truncate the folder names to be without the last portion of the name, so you may see two folders that appear to be named "org.eclipse.core.runtime". Copying them will still work)
    6. This will restore the projects, workspace settings, and key bindings. (the dialog/window layout will be reset to the defaults and External Tool Configurations aren't copied. I looked but didn't find where those are stored)