Tag Archives: gamedev

Flash Builder 4.7 crashes loading workbench OSX

Today I had a similar problem to the one in this post – but instead of hanging, Flash Builder just failed to start up and quit during the “loading workbench” phase of initialization.

In the earlier post, I mentioned deleting a .snap file in [workspacelocation]/.metadata/.plugins/org.eclipse.core.resources, but previously I hadn’t been able to find it. This time, there WAS a .snap file in that folder, but it was hidden.

Deleted it, and Flash Builder starts up like a champ.

Flash Builder 4.7 won’t reload SWC when it changes

According to this thread, Flash Builder will only notice when your library SWC changes if it’s in your project folder. Kind of sucks if you use the same SWC in multiple projects, like I do, but it appears to be the only option. Also, sometimes you need to clean the project to make the refresh happen.

Now, I’m not using the Flex framework, but also from the linked thread, if you use Flex you might be able to turn off a “global SWC cache.” I tried it for my plain-jane actionscript projects and it didn’t work.

Here’s the secondary method:

Find the .options file in the /Applications/Adobe Flash Builder 4.7/eclipse/plugins/com.adobe.flexbuilder.project_4.7.0.349722/ folder and look for a line like this:

# use a global swc cache across all projects when compiling with flex sdk 4 or higher
com.adobe.flexbuilder.project/useGlobalSwcCache=true

Try setting useGlobalSwcCache to false then restart Flash Builder and see if that helps.

NOTE: This may result in longer compile times in Flash Builder if your workspace includes Flash Library Projects since those generated SWCs will no longer be cached and instead will be rebuilt every time.

Again, I tried this secondary option, but it didn’t work for me (OSX 10.10.3 Yosemite), possibly because I don’t actually use Flex, and the comment in the config file specifically mentions Flex SDK.

Sensors in Box2D

Box2D has these things called “sensors”. What are they? They are shapes that can be attached to a body with a fixture just like any other, but the crucial difference is they don’t participate in collisions. In other words, something colliding with a sensor will never cause the object containing the sensor to change position, speed, rotation, or acceleration. “So, what’s the point?” you say. The point is you can still cause code to execute when these collisions begin or end, through your contact listener.

What good does that do? Plenty. You can use sensors to determine when any two shapes start or end colliding. You could use sensors to define field-of-vision for enemy units, create a proximity alarm when the player gets too close to laser tripwires or torpedoes, guide a heat-seeking missile, manage fog of war rendering decisions, or help enemies avoid crashing into other enemies and walls.

In my upcoming game Deep Space Demolition Derby, I’m using sensors in a few places. First, there is a big circular sensor surrounding the player:

20140408-015555.jpg

The above picture shows the game in debug mode, where the shapes overlaid on the sprites show the Box2D objects that represent the sprites for physics purposes. I have chosen to represent most of the objects in my game with circles. You can see a small circle around the player, and a small circle around each collectible crystal. This defines their physical extent – when those shapes touch, a collision has happened.

The large circle around the player is a sensor that doesn’t cause collisions, but causes collectible crystals and powerups to appear when you get close enough. Also, when you have a magnet powerup, any crystal that is within that distance will be sucked towards you.

Enemies have sensors to help control their AI. I put a couple of circles to the front left and right of enemies. These are like “vision” areas that help the enemy “sense” what’s in front of it to the right or left sides. When a wall or other enemy or the player overlaps either of those sensors, the enemy turns away to avoid a collision.

In the picture below, the enemy’s sensor has overlapped with the player and so it will turn to avoid a collision:

20140408-020112.jpg

The next picture shows the enemy has turned away and dodged the player:

20140408-020327.jpg

As development continues, I’m sure I’ll find a lot more uses for Box2D’s sensors. I’m excited to continue exploring this cool feature, and excited for the possibilities it has to improve my games.

Juiciness

This video literally changed how I look at game development. I strongly encourage you to watch it if you’re at all interested in making games.

These presenters explain the concept of “juiciness”. Juiciness incorporates things like eye candy, animation, sound effects, tweens, and is essential to make your game fun and engaging. I’m now looking for ways to incorporate “juiciness” into every game I make.

Starling Tween Transition Cheat Sheet

I’ve been making games using the Starling Framework, and I’ve been using a lot of tweens. Tweening is a great way to add what I call “juiciness” to a game (I borrowed that term from here). Tweening gives your user interface some animation, and if it’s not used too much, can really make your game more fun.

There’s a whole bunch of different motion types that can be used with tweens. This graphic helps when trying to picture the various tween transition types, or “easing” functions – not just in the Starling framework, but in any other platform.

sparrow-transitions

Graphic originally from here.

Supporting “the other landscape” in AIR for iOS

Most iOS games are either portrait-only or landscape-only. The AIR application descriptor file lets you easily specify this. All you have to do is add the following to your descriptor file, inside the initialWindow tag:

<aspectRatio>landscape</aspectRatio>
<autoOrients>false</autoOrients>

The above configuration will result in a landscape app that will be right-side up when the home button is on the right – known as “landscape right” – that doesn’t rotate to portrait when the device is turned. However, it will ALSO not rotate when the device is turned to “the other landscape orientation” – if you position your iDevice so that the home button is on the left, your app will be upside-down!

To have a truly industry-standard game, you’ll want your portrait games to support both “Default” and “Upside Down”, and your landscape games to support both “Landscape Left” and “Landscape Right”, as Apple calls them:
iphone_orientations

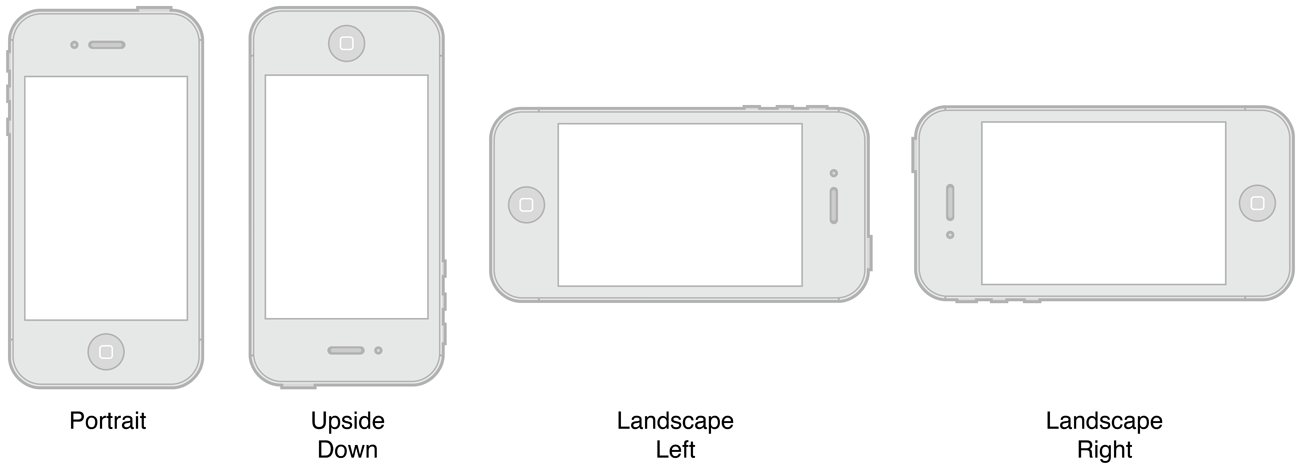
To accomplish this, we need to think about the concept of “stage orientation” as opposed to “device orientation”. Adobe’s StageOrientation class defines four orientations – DEFAULT, ROTATED_LEFT, ROTATED_RIGHT, and UPSIDE_DOWN. These orientations describe the orientation of the Flash stage relative to the physical device. DEFAULT simply means that the stage is oriented to match the physical orientation of the device. ROTATED_RIGHT and ROTATED_LEFT mean the stage is rotated either 90 degrees right or left. UPSIDE_DOWN means the stage is rotated 180 degrees.

For our game to work properly, we want to allow the stage to be in either the DEFAULT or UPSIDE_DOWN orientations, but NOT the ROTATED_LEFT or ROTATED_RIGHT orientations. Fortunately, Adobe has added some events that help us do just that. If your app descriptor has autoOrients set to true, the StageOrientationEvent.ORIENTATION_CHANGING event will be broadcast when the device’s accelerometer has detected the physical orientation has changed, and the Stage is about to rotate to follow suit. If you call Event.preventDefault(), you will prevent the Stage from rotating. So all we have to do is disallow rotating to the left or right, and allow rotating to the upside-down or default positions.

To accomplish this, add the following to your application descriptor file, to enable the Stage to rotate to follow the device’s physical orientation:

<autoOrients>true</autoOrients>

And add this to your app’s main class, to only allow a subset of those rotations to actually take place:

// we can control which orientations we want to allow with the following code
stage.addEventListener(StageOrientationEvent.ORIENTATION_CHANGING, onOrientationChanging );

function onOrientationChanging( event:StageOrientationEvent ):void
{
	// If the stage is about to move to an orientation we don't support, let's prevent it
	// from changing to that stage orientation.
	if(event.afterOrientation ==
		StageOrientation.ROTATED_LEFT || event.afterOrientation ==
		StageOrientation.ROTATED_RIGHT )
		event.preventDefault();
}

And voila! Your app now support both portrait orientations, or both landscape orientations!

Condensed from http://www.adobe.com/devnet/flash/articles/screen_orientation_apis.html

Also helpful: https://developer.apple.com/library/ios/featuredarticles/ViewControllerPGforiPhoneOS/RespondingtoDeviceOrientationChanges/RespondingtoDeviceOrientationChanges.html